Teaching About Time Online: Leveraging Students’ At-Home Resources
Rusty Bresser
I was talking with a friend of mine recently who is a primary teacher and I asked her what her favorite lessons are for teaching about time. Her face scrunched up; this was not one of her favorite math topics. I told her that this was a common response that I get from many of my teacher friends and colleagues. It got me thinking and wondering. What is so tricky about teaching time, and why is it so difficult for students? What are teachers’ favorite activities that make learning about time fun, engaging, and accessible if we are teaching online? Teaching mathematics in virtual platforms can be challenging for many reasons. One way to make teaching about time meaningful to students is to use activities that leverage the resources in their homes, while keeping in mind that not all students have access to the same materials.
Learning about time can be an interesting context for developing an array of skills, including to add, multiply, subtract, divide, and develop and apply problem solving skills, as well as providing a model for thinking and learning about fractions. The Common Core Standards call for students in grades 1-4 to learn how to read analog and digital clocks to the nearest hour and half hour, and to the nearest five minutes using a.m. and p.m.; tell and write time to the nearest minute and measure time intervals in minutes; and solve word problems that involve time using different operations.
Learning about time can be difficult for students. On an analog clock for example, the ‘whole’ is divided into 12 parts and each part can represent either five minutes or one hour. When we say, “It’s a quarter of ten in the morning,” we mean 15 minutes before ten. This can be confusing if students are used to thinking that a quarter of a dollar is 25 cents. Another challenge for students is the idea of a.m. or before midday (Ante Meridiem in Latin) and p.m. or after midday (Post Meridiem in Latin). Students know that there are 24 hours in a day, but on a clock, we see only 12 numbers. The same clock is used twice in 24 hours, and this can be confusing. Finally, figuring the passage of minutes, seconds, and hours can be especially challenging when solving real-world problems.
We want students to learn how to read analog clocks and use procedures to figure the answers to elapsed time problems. But we also want students to understand the concept of time and solve problems about time using math reasoning.
Not only do we want students to develop concepts and skills, but we also want them to participate in activities that are enjoyable, relatable, engaging, and that are set in problem- solving contexts using materials at their disposal. Fortunately, measurement is one of those topics in mathematics that offers many connections to the real world.
Following are some favorite lessons and strategies that focus on time from various resources, colleagues, and mentors. Each one makes use of students’ home resources and activities.

Read Clocks and More Clocks by Pat Hutchins (1970)
Before reading Clocks and More Clocks, tap students’ knowledge and experience with time and clocks. Show them a clock face and ask them what they notice and what they wonder.
Clocks and More Clocks by Pat Hutchins tells the story of Mr. Higgins who finds an old clock in his attic and wonders to himself, “How do I know if it’s correct?” So, he fills his house with more clocks only to find that as he moves from room to room, they each tell a different time. The clockmaker helps him solve the problem at the end of the story.
I like this book because it’s a great way to get students thinking about the passage of time. Plus, it’s fun and silly and kids figure out right away that Mr. Higgins doesn’t understand how a clock works. The story sets the stage for rich conversations about how to read analog clocks and how long a minute or two really is. During the read aloud, students can practice showing the different times in the story on their own paper or virtual clocks.
I recommend the book for young children and even third and fourth graders as a way to begin a unit on time. It’s also a nice way to introduce a scavenger hunt for clocks (see below). I suggest that if you have to use a video to show the book, turn off the sound and use your own reading voice since kids would rather hear their own teacher than someone they don’t know.
Here’s a link to the online video: https://www.youtube.com/watch?v=3YiO79aYTbE
Scavenger Hunt
Start by tapping students’ knowledge and experience with time and clocks. Show them a clock face and ask them what they notice and wonder. After a brief discussion, begin your scavenger hunt. For younger students, have them find devices in their home, report what they find, and discuss how the devices are the same and different. You could model this by showing them the different devices in your home. One teacher I spoke with had the students use Seesaw to videotape or take pictures of the devices they found on their scavenger hunt. Afterward, she shared what the students had found during a class meeting on Zoom.
For older students, you could have them go on a scavenger hunt and then collect data and do some interesting graphing activities. For example, set up a graph and collect data about how many of each device was found: wrist watches, analog clocks, digital clocks, time devices on computers or cell phones, and so on. Have the students talk about how the devices are the same and different, and then have them look at the data and talk about what they notice.
Make Homemade Analog Clocks

One of the best ways to help young children learn how to tell time on an analog clock is to have them make their own on which to practice. Most paper clocks require a brad to hold the hands in place. Not everyone has a brad at home, so an alternative is to model and have students make a cardboard clock which uses a push pin. This clock takes a little adult help and supervision (especially with the push pin) but is accessible and easy to make.
https://www.stemlittleexplorers.com/en/make-cardboard-clock-learn-tell-time/
I recommend having students first make the clock with only the hour hand. Starting with both the hour and the minute hand is too confusing for children. Start with the hour hand and have children explore telling time to the hour before they put the minute hand on their clock. In fact, hundreds of years ago in Europe, clocks started off with only the hour hand. People used to estimate the minutes and seconds since they didn’t need that sort of precision in their lives.
If you don’t want to have students make their own clocks, try having them use a virtual analog clock to work on: https://www.visnos.com/demos/clock

Read About Time: A first Look at Time and Clocks by Bruce Koscielniak
One activity to do with students in order to leverage at home resources is to have them make a water clock. The ancient Egyptians devised water clocks to keep time at night or on cloudy days since they used sundials for keeping time during the day. The Greeks and Romans also used water clocks and called them “clepsydra” or “thieves of water.” For making a water clock, all students need is a piece of paper, three plastic cups, tape, a pen, a bowl of water, and a push pin. Students can use the water clock to measure how long it takes to do different activities at home.
The following video shows you how to make one: https://www.youtube.com/watch?v=36Qv8s6ZkDA
How Long is a Minute?
This is an activity I learned about from Marilyn Burns, and it’s appropriate for first and second graders. For the first part of the activity, tell your students that you’re going to see if they have an idea how long one minute is. Tell them that when you say, “Go!” they should close their eyes and then raise their hand when they think one minute has passed. Be sure to let them know when one minute has passed! They are usually surprised.
For the second part of the activity, have each student get a piece of paper and a pencil and when you say, “Go!” have them write the letter “A” as many times as they can. When one minute is up, say, “Stop!” Have the students count the number of “A’s” they wrote (by ones, fives, or tens). This activity serves two purposes. One, it gives students an idea of elapsed time. It also gives students an opportunity to count in different ways-by ones, twos, fives, and tens, an important skip counting skill students need when reading analog clocks.
A Day in the Life Storyboard
Begin by asking students what activities they do during their day. Ask the students questions such as, “At what time do you get up?” “What time do we start math?” “What time does math end?” “How long is that?” “What time do you eat lunch?” “For how long?” “What are your favorite activities during the day and when do you do them?”
The next part of the activity can be an independent task the students do asynchronously. Students create a slideshow of their day on Google Slides. For each slide, students do the following:
Take a photo of the activity they are engaged in.
-
Insert the photo into the slide.
-
Label the slide (e.g. “Eat Breakfast”).
-
Access a virtual analog clock, go to: https://www.visnos.com/demos/clock
-
Set the time of the activity on the analog clock and take a screenshot.
-
Insert the analog clock into the slide.
Here’s an example of the first slide in my A Day in the Life Storyboard:


For younger children, read the book It’s About Time by Stuart J. Murphy (Mathstart, 2005) to introduce the A Day in a Life Storyboard. It takes you through a day in the life of a family, showing on each page an analog clock with the time various activities take place. I suggest showing the video of the book and mute the sound so that you can read the story aloud to your students. Here’s a link to the video: https://www.youtube.com/watch?v=yQMBSJhUCAs
You might also provide sentence frames or stems for students to complete when sharing about their day. Frames and stems help students talk about their learning and are especially helpful to English language learners. Sentence frames/stems might include:
Around 8 o’clock a.m. we usually _________________.
Around noon we usually ________________________.
Around _____ I like to __________________________.
I usually __________ at around __________________.
If making A day in a Life Storyboard using Google Slides is too difficult for young students, model an example of one for them to make using a piece of paper divided into 8 parts. In each frame, draw a picture of an activity, label it, and then draw an analog clock with the time the activity begins. Here’s an example of one frame of a storyboard:

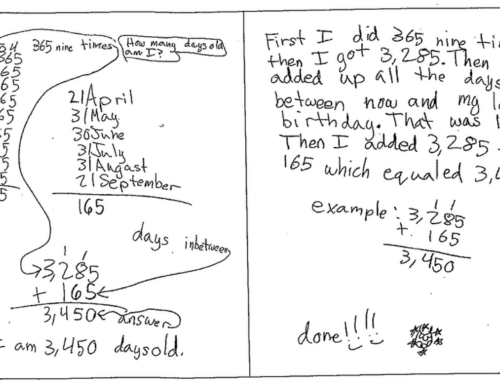
Using the Storyboard to Create and Solve Story Problems
For older students, have them use their storyboard to create and then solve story problems. Students can create and solve their own, or, you can pose problems for them to fill in and solve using frames like this:
We eat lunch at ____ p.m. We eat dinner at ____ p.m. How long do we have to wait between these meals?
I start my homework at ____ p.m. and finished at ____ p.m. How much time does it take me to finish my homework?
I started ________ at _____ a.m. It took me _____ hours and ____ minutes to finish. At what time did I finish?
Another idea is to have students choose one of the activities on their storyboard and model how to figure out how much time has elapsed using an open number line. A number line is a useful tool when trying to figure out the distance (or passage of time) between two numbers (or times). One nice thing about an open number line is that there are many different ways to move back and forth. To model how to use an open number line to show elapsed time, I suggest that you begin by showing students an example and ask them what they notice:
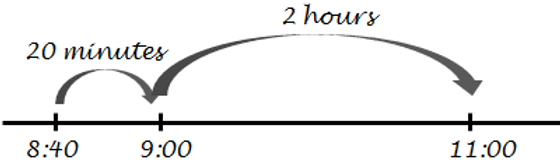
You might also ask them what activity might begin at 8:40 and end at 11:00. Then show them another example:
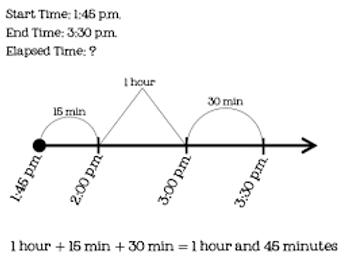
Once again, ask your students what they notice and what activities might take 15 minutes, 1 hour, or 30 minutes. Talk about what ‘elapsed time’ means. With the right support, students can then use the activities on their storyboards to represent and figure elapsed time on open number lines.
Experimenting with Timers
Begin this activity by talking with students about time. “How do we know what time it is?” “How do we measure how long something takes for us to do?” “What would people do without clocks?”
Next, show the students the timer on your cell phone and ask them if they’ve ever used a timer before. Have them share their experiences. If you are teaching online synchronously, have students estimate how many times they can do something at home in one minute. Then time your students as they write their name, build a stack of books, jump up and down, clap their hands, and so on.
With older students, introduce the stopwatch on your cell phone and then tap their prior knowledge and experience. Teach them how to use the stopwatch and then have them estimate and then measure how long it takes them to do different things such as make their bed, do the dishes, do their homework, complete a math problem, read a page in a book, and so on. These activities help students learn about the passage of time, give them experience using measurement tools, engage them in estimating and collecting data, and, most importantly, the experiences are fun and motivating.
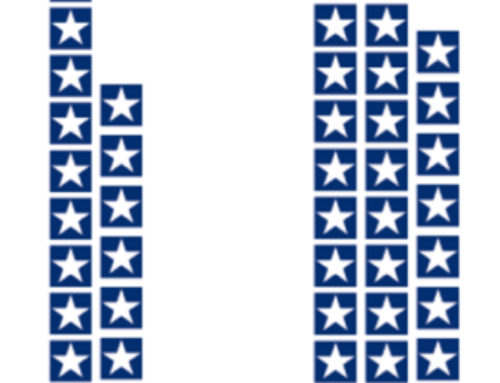
Using Clock Faces to Think about Fractions
There are many ways to help students think about one whole. The most common is thinking about pizzas, which can be limiting if that’s all students have as their referent. Providing students with many different ideas of what one-whole can look like helps them think flexibly about fractions. We can use analog clocks as a referent for one-whole.
I got this idea from Teacherblogspot.com. Students can make several paper clocks at home and then cut each one up into halves, thirds, and quarters so that they have hands-on manipulatives to assist them in thinking about fraction problems.

Once students make their clock manipulatives, ask them what they notice. Challenge them to think about their clock faces in terms of fractions of an hour. Then pose some problems for them to solve, each time having them explain their reasoning and show the answer with their clock manipulatives:
½ of an hour = _____ minutes.
¼ of an hour is the same as _____ minutes.
2/4 of an hour is the same as _____ minutes.
¾ of an hour = ____ minutes.
1/3 is an hour = ____ minutes
2/3 of an hour is the same as _____ minutes.
Another idea is to use clocks as models for fraction games. Roll Around the Clock is a classroom favorite which has been made available online to all during Covid-19 online learning (Investigations Curriculum). This game supports students in developing number sense with fraction operations as they add and place fractions around the clock to get close to 1 whole.

Leveraging Students’ At-Home Resources
Covid-19 has caused us to rethink instruction as we have shifted to online teaching. There are many challenges that teachers, students, and families face when schooling moves from the schoolhouse to families’ homes. When we write lesson plans and prepare to teach our students online, we will benefit from thinking about the materials that are required for our lessons. Do students have the resources at home in order to engage in the lessons? Do all of our students have access to those resources? We can see this situation as a limitation, or, we can see this challenge as an opportunity to make use of what students have at home to enhance our math lessons and use authentic contexts to enrich learning. Hopefully, the activity ideas in this blog will prompt some thinking about at-home resources.
What ideas do you have about leveraging students’ at-home resources?